As reported in my last post, I have decided to discontinue the Learn Linux Now project and site. I found that I just didn’t have the time to keep producing content.
Tech
New site, new videos
Even though I don’t post here that often any longer I thought it prudent to post about a new adventure I am undertaking. I started a new video series on YouTube and am posting it to a new site called Learn Linux Now. You can view the first post and video on my Introduction of why I am starting this series.

Scan your network and alert of new unknown clients
I’ve been looking for a way to scan my home network and alert me via email when a new device, by MAC address, is seen on my network. At one point I tried completing this with a shell script on my server using a flatfile database of known MAC addresses but either 1.) my shell-script-fu wasn’t strong enough to get the job done or 2.) I needed something more powerful, like python. Enter python.
Working at NASA I am surrounded by some incredibly intelligent people. So I decided to ask one of my co-workers to assist me with writing a python script. This is what we came up with. You can find his original script here: https://github.com/AdamFSU/Scripts
Here is what I worked out.
I have a CentOS 7 server running a postfix smtp relay. Here is the configuration for postfix I took from a RHCE 7 class I took on Linux Academy:
- Install necessary packages
yum install postfix cyrus-sasl cyrus-sasl-plain –y
- Edit the config: vim /etc/postfix/main.cf
relayhost = [smtp.mailserver.com]
example: relayhost = [smtp.gmail.com]:587
smtp_use_tls = yes
smtp_sasl_auth_enable = yes
smtp_sasl_password_maps = hash:/etc/postfix/sasl_passwd
smtp_tls_CAfile = /etc/ssl/certs/ca-bundle.crt
smtp_sasl_security_options = noanonymous
smtp_sasl_tls_security_options = noanonymous
inet_protocols = ipv4
inet_interfaces = loopback-only
mynetworks = 127.0.0.0/8
myorigin = $myhostname
mydestination =
local_transport = error: local delivery disabled
create a sasl password file specifically for Gmail:
cd /etc/postfix
vim sasl_passwd
[smtp.gmail.com]:587 username@gmail.com:password
Finish configuration of sasl password:
postmap sasl_passwd
chown root:postfix sasl_passwd
chmod 640 sasl_passwd
postmap sasl_passwd
- Enable and start necessary services
systemctl enable postfix && systemctl start postfix
Now, here are the additional requirements for the script:
Prerequisites:
- Required Python packages: python-nmap – To install run: python3 -m pip install python-nmap
- The $PYTHONPATH environment variable must be set: example: export PYTHONPATH=/usr/lib/python3/dist-packages/ For CentOS added to root’s .bashrc: export PYTHONPATH=/usr/local/lib/python3.6/site-packages/
- This script also uses the mail utility for sending email alerts – For CentOS: install mailx
yum install mailx -y - Flatfile called master_mac.txt with listing of known MAC addresses on the LAN
- The nmap utility
yum install nmap -y
Here is the python script:
#!/usr/bin/python3

# *** NOTE: THIS SCRIPT MUST BE RUN AS ROOT ***

# python module imports
import os
import shutil
import nmap
import sys
import subprocess
from datetime import datetime

# variable containing the filepath of the nmap scan results file
mac_list = os.environ['HOME'] + "/maclist.txt"

# variable containing the filepath of the approved mac addresses on the LAN file
masterfile = os.environ['HOME'] + "/master_mac.txt"

# If a file from previous nmap scans exists, create a backup of the file
if os.path.exists(mac_list):
    shutil.copyfile(mac_list, os.environ['HOME'] + '/maclist_' + datetime.now().strftime("%Y_%m_%H:%M") + '.log.bk')

# Open a new file for the new nmap scan results
f = open(mac_list, "w+")

# Print to console this warning
print("Don't forget to update your network in the nmap scan of this script")

# This block of code will scan the network and extract the IP and MAC address
# Create port scanner object, nm
nm = nmap.PortScanner()
# Perform: nmap -oX - -n -sn 192.168.0.1/24
# *** NOTE: -sP has changed to -sn for newer versions of nmap! ***
# Change this to your network IP range
nm.scan(hosts='192.168.0.1/24', arguments='-n -sn')
# Retrieve results for all hosts found
nm.all_hosts()
# For every host result, write their mac address and ip to the $mac_list file
for host in nm.all_hosts():
    # If 'mac' expression is found in results write results to file
    if 'mac' in nm[host]['addresses']:
        f.write(str(nm[host]['addresses']) + "\n")
    # If 'mac' expression isn't found in results print warning
    elif nm[host]['status']['reason'] != "localhost-response":
        print("MAC addresses not found in results, make sure you run this script as root!")

# Close file for editing
f.close()
# Open file for reading
f = open(mac_list, "r")
# Read each line of file and store it in a list
mac_addresses = f.read().splitlines()
# Close file for reading
f.close()
# Open masterfile for reading
if os.path.isfile(masterfile):
    f2 = open(masterfile, "r")
else:
    print("Could not find master_mac file! Verify file path is correct!")
    sys.exit()

# Read each line of file and store it in a list
master_mac_addresses = f2.read().splitlines()
# Close file for reading
f2.close()

# Create empty list of new devices found on network
new_devices = []

# For every list entry in the mac_addresses list
for i in mac_addresses:
    # Convert the list index from a string to a dictionary so we can parse out mac address for comparison
    dic = eval(i)
    # Compare mac address portion of dictionary to mac addresses in the master_mac_addresses file
    # If the scanned mac address is not in the master_mac_addresses file
    if dic['mac'] not in master_mac_addresses:
        # Add scanned mac address to new devices list
        new_devices.append(dic)

# If the new_devices list isn't empty
if len(new_devices) != 0:
    # output a warning to the console
    warning = "\nWARNING!! NEW DEVICE(S) ON THE LAN!! - UNKNOWN MAC ADDRESS(ES): " + str(new_devices) + "\n"
    print(warning)

    # Create email notification of the warning
    try:
        # subject of email
        subject = "WARNING, new device on LAN!"
        # content of email
        content = "New unknown device(s) on the LAN: " + str(new_devices)
        # shell process of sending email with mutt
        m1 = subprocess.Popen('echo "{content}" | mail -s "{subject}" youremail@gmail.com'.format(
            content=content, subject=subject), shell=True)
        # output whether email was successful in sending or not
        print(m1.communicate())

    # if sending of the email fails, this will output why
    except OSError as e:
        print("Error sending email: {0}".format(e))
    except subprocess.SubprocessError as se:
        print("Error sending email: {0}".format(se))
Next is to make sure your Gmail is setup correctly by making sure to enable less secure app access in Google account security. Then setup a crontab under root that looks something like this:
#scan the network every 10 minutes
*/10 * * * * /root/bin/nmapscan_wo_log.py > /dev/null 2>&1
Nextcloud deployment via Docker
It’s been a long time since posting but I thought I would document my deployment for others, and my future self, in case the same issues are discovered.
I recently decided to replace my Ubuntu server instance running Nextcloud installed via snap on DigitalOcean with a CentOS 7 (my personal server preference) instance deployed via Docker container. In my search for containers I found the guys over at LinuxServer.io have containers on Docker Hub. After joining their Discord community I was directed by one of the community team members the site blog post on deploying LetsEncrypt, MariaDB, and Nextcloud (with reverse proxy) all in one stroke. That blog post can be found here: Let’s Encrypt, Nginx & Reverse Proxy Starter Guide – 2019 Edition
Being a true noob at containers (I’ve taken classes but am still in the learning stage), I read the post and composed the docker compose file based on that article. That file is below. But, reader, if you have never setup Docker before, here are the steps I completed on CentOS 7 all before getting started on deploying the containers.
First, install and setup Docker:
1. Install pre-req
sudo yum install -y yum-utils device-mapper-persistent-data lvm2
2. Add the repo
sudo yum-config-manager –add-repo https://download.docker.com/linux/centos/docker-ce.repo
3. Install the community edition
sudo yum install -y docker-ce docker-ce-cli containerd.io
4. Start and enable the service
sudo systemctl start docker && sudo systemctl enable docker
5. Add user to the ‘docker’ group
sudo usermod -aG docker $(whoami)
6. Test the config
docker run hello-world
Second, install Docker compose:
*Note: the latest version and instructions can be found on Docker’s site here
1. Download the latest version via curl
sudo curl -L “https://github.com/docker/compose/releases/download/1.25.0/docker-compose-$(uname -s)-$(uname -m)” -o /usr/local/bin/docker-compose
2. Change executible permissions
sudo chmod +x /usr/local/bin/docker-compose
3. Check the version
docker-compose –version
Now, the next step for your cloud VPS, if you are deploying to the cloud, is to make sure your public domain’s DNS pointing to your VPS is setup correctly. DigitalOcean has great documentation on this process.
Now, after all is configured on your server, compose your Docker compose file and deploy. Below is a sample from my file. If you will note that I have volumes mounted. So that I had enough space for my files synchronization I also pay for block storage on DigitalOcean that is mounted to my VPS. Also, during the deployment, I had to generate an API token key on DigitalOcean. If you view your LetsEncrypt docker log during the deployment (see LinuxServer.io blog for reference) you will see it gripe about not having the proper credentials in the /config/dns-conf/digitalocean.ini file.
Docker compose
---
version: "3"
services:
  nextcloud:
    image: linuxserver/nextcloud
    container_name: nextcloud
    environment:
      - PUID=1001
      - PGID=1001
      - TZ=America/New_York
    volumes:
      - /mnt/myncvolume/nextcloud/config:/config
      - /mnt/myncvolume/nextcloud/data:/data
    depends_on:
      - mariadb
    restart: unless-stopped
  mariadb:
    image: linuxserver/mariadb
    container_name: mariadb
    environment:
      - PUID=1001
      - PGID=1001
      - MYSQL_ROOT_PASSWORD=myrootpassword
      - TZ=America/New_York
      - MYSQL_DATABASE=nextcloud
      - MYSQL_USER=myusername
      - MYSQL_PASSWORD=mypassword
    volumes:
      - /mnt/myncvolume/mariadb/config:/config
    restart: unless-stopped
  letsencrypt:
    image: linuxserver/letsencrypt
    container_name: letsencrypt
    cap_add:
      - NET_ADMIN
    environment:
      - PUID=1001
      - PGID=1001
      - TZ=America/New_York
      - URL=myurl.org
      - SUBDOMAINS=wildcard
      - VALIDATION=dns
      - DNSPLUGIN=digitalocean
      - EMAIL=myemail@myemaildomain.com
    volumes:
      - /mnt/myncvolume/letsencrypt/config:/config
    ports:
      - 443:443
      - 80:80
    restart: unless-stopped
The above compose file was not my original file as I ran into scenarios where it didn’t seem to work in my original compose file during the initial Nextcloud configuration in the wizard, specifically at the section where you create an admin. The below screenshot is from when it finally worked. The problem I kept running into is that I was entering my actual name in the admin field and the root user in the bottom section thinking I needed to use the database root user to create the admin account. Using the docker compose sample above as a reference, you place the MYSQL_USER that the container creates for you in the bottom section. And all is well.

Glances – System Monitoring
Since I have only one (Ubuntu) server at home currently running as a PVR (personal video recorder) for recording TV shows from a OTA (over-the-air) antenna and Plex for viewing my content via the Roku (more on all that on a later post), I like to see what my server is doing as far as performance at a glance from time to time. Sure, top or htop will do the job but I want more. I get more from using Glances. You can get more information on the utility here.
I setup my server to run the web UI and launch at start. I created this script to easily deploy to any machine running Ubuntu. I included in the script to also create a systemd service so that it would start after each reboot. Here’s the script:
#!/bin/bash
# This script will install the Glances monitoring tool and create
# a startup service for the Glances web server. See 'glances --help'
# for details

# Update and install
sudo apt update && sudo apt install -y glances
sleep 3

# Change the startup switch from false to true
sudo sed -i 's/false/true/g' /etc/default/glances
sleep 3

# Create the systemd service
sudo touch /lib/systemd/system/glances.service
sudo bash -c 'cat <<EOF > /lib/systemd/system/glances.service
[Unit]
Description = Glances web server
After = network.target

[Service]
ExecStart = /usr/bin/glances -w

[Install]
WantedBy=multi-user.target
EOF'
sleep 2

# Reload systemd
sudo systemctl daemon-reload
sleep 2
sudo systemctl enable glances.service
sleep 2
sudo systemctl restart glances.service
sleep 2
sudo systemctl status glances.service
sleep 2
hostip=`hostname -I`
echo
echo "Monitoring of this server will be viewable at http://$hostip:61208"
echo
I have a third monitor above my other monitors that has a Raspberry Pi 3 connected where I have my Glances page running.

Here is a closer look at the web UI.
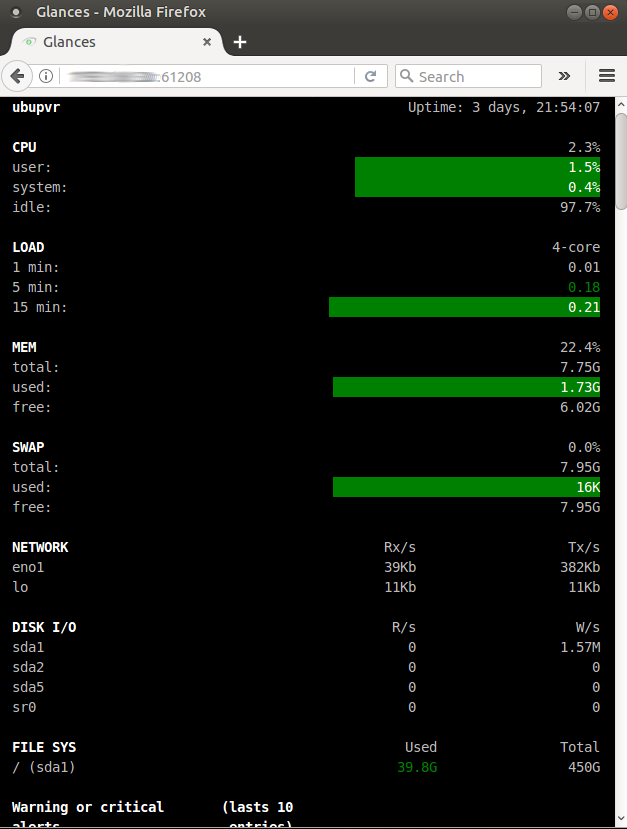
It’s been very convenient to view during recordings so that 1.) I know when there is a recording and conversion of the video file going on by seeing a spike in CPU and memory and 2.) to see how well my machine performs during those recordings and conversions.
Shell Scripting: Updates – Part 2
Where I work we don’t have anything like Red Hat Satellite to deploy updates to our thirteen Red Hat servers. So that I don’t have to touch each server manually to apply updates in a relatively controlled fashion, I wrote some shell scripts that will connect to each server, apply updates and then ask if you want to reboot. Again, I don’t normally reboot unless there is a kernel update.
This is the script I use to update servers in our Dev/Test and non-web Production servers:
#!/bin/bash
clear
# SSH to the server and run local yum update
echo "**** Connecting to server1 to update ****"
echo
ssh -t user@server1 sudo yum update -y 2>&1 | tee -a $HOME/Documents/yumlogs/Dev_Test/updates_server1_`date +%Y%m%d`.log
echo
echo "**** Finished updating server1 ****"
echo
read -p "Press [Enter] to continue"
clear
echo "----------------------------------------------------"
echo
# SSH to the server and run local yum update
echo "**** Connecting to server2 to update ****"
echo
ssh -t user@server2 sudo yum update -y 2>&1 | tee -a $HOME/Documents/yumlogs/Dev_Test/updates_server2_`date +%Y%m%d`.log
echo
echo "**** Finished updating server2 ****"
echo
read -p "Press [Enter] to continue"
clear
echo "----------------------------------------------------"
echo
# **************** REBOOTS SECTION *******************
echo "^^^ Do you want to reboot server1? (yes/no) ^^^"
read REPLY
if [ "$REPLY" == "yes" ]; then
echo
echo "*** WARNING: You have selected to reboot server1 ***"
sleep 3
# SSH to the server and run shutdown
ssh -t user@server1 sudo shutdown -r +1 Rebooting in 1 minute
sleep 30
elif [ "$REPLY" == "no" ]; then
echo
echo "--- server1 will not reboot ---"
sleep 2
else
echo
echo "invalid answer, type yes or no";
fi
sleep 2
echo
echo "^^^ Do you want to reboot server2? (yes/no) ^^^"
read REPLY
if [ "$REPLY" == "yes" ]; then
echo
echo "*** WARNING: You have selected to reboot server2 ***"
sleep 2
# SSH to the server and run shutdown
ssh -t user@server2 sudo shutdown -r +1 Rebooting in 1 minute
sleep 30
elif [ "$REPLY" == "no" ]; then
echo
echo "--- server2 will not reboot ---"
sleep 2
else
echo
echo "invalid answer, type yes or no";
fi
sleep 2
echo
Then I use this script to run on my web servers that are in load balancers making sure to complete updates in a controlled fashion.
#!/bin/bash
# **************** THIS SCRIPT IS FOR UPDATING REMOTE SERVERS ON LOAD BALANCERS *******************
clear
echo
echo
echo -e " ---->> \033[33;7mREMEMBER TO COMPLETE A SNAPSHOT OF THE SERVERS BEFORE PROCEEDING\033[0m <<----"
echo
sleep 5
read -p "Press [ENTER] to continue "
echo
echo "**** Please remove WEB1 from load balance rotation ****"
echo
sleep 5
read -p "Once the WEB1 has been removed from rotation press [Enter] to continue to complete updates "
clear
echo
# **************** UPDATES SECTION FOR WEB1 *******************
# SSH to the server and run local yum update
echo "**** Connection to WEB1 to update ****"
echo
ssh -t username@WEB1 sudo yum update -y 2>&1 | tee -a $HOME/updates_web1_`date +%Y%m%d`.log
echo
echo "**** Finished updating WEB1 ****"
clear
echo
# **************** REBOOTS SECTION FOR WEB1 *******************
echo "^^^ Do you want to reboot WEB1? (yes/no) ^^^"
read REPLY
if [ "$REPLY" == "yes" ]; then
 echo
 echo "*** WARNING: You have selected to reboot WEB1 ***"
 sleep 3
 echo
 # SSH to the server and run shutdown
 ssh -t username@WEB1 sudo shutdown -r +1 Rebooting in 1 minute
 sleep 30
elif [ "$REPLY" == "no" ]; then
 echo
 echo "--- WEB1 will not reboot ---"
 sleep 2
else
 echo
 echo "invalid answer, type yes or no";
fi
echo
echo "**** Please test WEB1 before moving on to the next phase ****"
sleep 5
echo
read -p "Once WEB1 is up after a reboot (if rebooted) and has been tested press [Enter] to continue to WEB2"
echo
# **************** DONE WITH REBOOTS SECTION FOR WEB1 *******************
clear
echo "**** Please add WEB1 back into rotation and remove WEB2 from load balance rotation ****"
echo
sleep 5
read -p "Once WEB2 has been removed from rotation press [Enter] to continue to complete updates "
clear
echo
# **************** UPDATES SECTION FOR WEB2 *******************
# SSH to the server and run local yum update
echo "**** Connection to WEB2 to update ****"
echo
ssh -t username@WEB2 sudo yum update -y 2>&1 | tee -a $HOME/updates_104_`date +%Y%m%d`.log
echo
echo "**** Finished updating WEB2 ****"
clear
echo
# **************** REBOOTS SECTION FOR WEB2 *******************
echo "^^^ Do you want to reboot WEB2? (yes/no) ^^^"
read REPLY
if [ "$REPLY" == "yes" ]; then
 echo
 echo "*** WARNING: You have selected to reboot WEB2 ***"
 sleep 3
 echo
 # SSH to the server and run shutdown
 ssh -t username@WEB2 sudo shutdown -r +1 Rebooting in 1 minute
 sleep 30
elif [ "$REPLY" == "no" ]; then
 echo
 echo "--- WEB2 will not reboot ---"
 sleep 2
else
 echo
 echo "invalid answer, type yes or no";
fi
echo
echo "**** Please test the WEB2 before moving on to the next phase ****"
sleep 5
echo
read -p "Once WEB2 is up after a reboot (if rebooted) and has been tested, add WEB2 back into rotation and press [Enter] to continue "
echo
# **************** DONE WITH REBOOTS SECTION FOR WEB2 *******************
clear
Shell Scripting: Updates – Part 1
One thing I have learned with shell scripting is that it’s a wonderful tool to use for automation. What I mean by that is that it’s perfect for promoting less typing. My touch typing has improved over the years so much that I can type pretty fast, however, I make errors and the less I type the better. With that being said, here are the scripts I run on my machines each day when I first login to complete updates:
Fedora/Korora
#!/bin/bash
# Script to check for updates on Fedora, update, and then reboot if
# the kernel was updated
rm -f $HOME/updates.txt
echo
clear
echo " ========== "
echo
echo " Checking for updates... "
echo
sudo dnf check-update
echo
sleep 2
echo " Do you want to update the machine? (yes/no) "
read UPREPLY
if [ "$UPREPLY" == "yes" ]; then
echo
echo "*** Updating ***"
sleep 2
echo
sudo dnf update -y | tee -a $HOME/updates.txt
sleep 3
elif [ "$UPREPLY" == "no" ]; then
echo
echo "--- Will not update ---"
sleep 2
exit 0
else
echo
echo "invalid answer, type yes or no";
fi
echo
echo "*** Updates have been applied ***"
echo
echo "*** Here is a list of the updates ***"
sleep 3
clear
echo " ========== "
echo
cat $HOME/updates.txt | more
echo
sleep 5
echo " ========== "
grep "kernel" $HOME/updates.txt
echo
sleep 5
read -p " Press [Enter] to continue "
rm -f $HOME/updates.txt
clear
# **************** REBOOTS SECTION *******************
echo
echo "^^^ Do you want to reboot the machine? (yes/no) ^^^"
read REPLY
if [ "$REPLY" == "yes" ]; then
echo
echo "*** WARNING: You have selected to reboot ***"
sleep 3
sudo shutdown -r +1 Rebooting in 1 minutes
elif [ "$REPLY" == "no" ]; then
echo
echo "--- machine will not reboot ---"
sleep 3
exit 0
else
echo
echo "invalid answer, type yes or no";
fi
sleep 3
With the above script, basically, it checks for updates, logs it to a text file, reads the text file, points out the keyword “kernel” and then ask if you want to reboot . If it finds that there is a kernel update then my normal practice is to reboot. If there is no kernel update I don’t reboot.
Ubuntu
#!/bin/bash
# Script to check for updates on Fedora, update, and then reboot if
# the kernel was updated
rm -f $HOME/updates.txt
echo
clear
echo " ========== "
echo
echo " Checking for updates... "
echo
sudo apt update && sudo apt list --upgradable
echo
echo " ========== "
sleep 3
echo
echo " Do you want to update the machine? (yes/no) "
read UPREPLY
if [ "$UPREPLY" == "yes" ]; then
echo
echo "*** Updating ***"
sleep 2
echo
sudo apt upgrade -y | tee -a $HOME/updates.txt
sleep 3
elif [ "$UPREPLY" == "no" ]; then
echo
echo "--- Will not update ---"
sleep 2
exit 0
else
echo
echo "invalid answer, type yes or no";
fi
echo
echo "*** Updates have been applied ***"
echo
echo "*** Here is a list of the updates ***"
sleep 3
clear
echo " ========== "
echo
cat $HOME/updates.txt | more
echo
sleep 5
echo " ========== "
grep "linux-headers" $HOME/updates.txt
echo
sleep 5
read -p " Press [Enter] to continue "
rm -f $HOME/updates.txt
sudo apt autoremove
clear
# **************** REBOOTS SECTION *******************
echo
echo "^^^ Do you want to reboot the machine? (yes/no) ^^^"
read REPLY
if [ "$REPLY" == "yes" ]; then
echo
echo "*** WARNING: You have selected to reboot ***"
sleep 3
sudo shutdown -r +1 Rebooting in 1 minutes
elif [ "$REPLY" == "no" ]; then
echo
echo "--- machine will not reboot ---"
sleep 3
exit 0
else
echo
echo "invalid answer, type yes or no";
fi
sleep 3
Another option with this is to not make the script interactive and just add to a crontab to schedule updates a couple times a week and reboot. Of course, you would have to remember when that reboot is supposed to take place and make sure you have no unsaved work kept on your machine before that scheduled reboot.
Part 2 of this series I will post some scripts I use to remotely update my servers at work.
Shell Scripting: My Story, My Post-Install – Part 3
Where I work we have very few Red Hat servers, so there hasn’t been a need, so far, to deploy a Red Hat Satellite server to assist with deploying servers. What I have done, since we use VMware ESXi for our virtual environment, is create a virtual machine template with some basic configuration. Once I deploy the virtual server I use some custom shell scripts to finish the configuration. What I have for holding the post-install scripts for the new servers is a NAS with a share. Because I am often changing the post-install scripts with new security changes and such, I have a basic updatesscripts.sh on the template that looks like this:
#!/bin/bash
# Mounts NAS share to local share directory on the server template
mount -t cifs //ipaddress/scripts_share /share -o username=username
sleep 2
# Copies mount to local scripts
yes | cp -R /share/* /scripts
sleep 4
umount /share
Then, when I am ready to start the server setup, I run this script that gives menu options:
#!/bin/bash
clear

selection=
until [ "$selection" = "0" ]; do
	echo ""
	echo "-------------------------"
	echo "* New Server Setup MENU *"
	echo "-------------------------"
	echo ""
	echo "1 - Change network IP"
	echo "2 - Change hostname"
	echo "3 - Register Red Hat server with Red Hat subscription"
	echo "4 - Update the server"
	echo "5 - Setup Red Hat 7 server"
	echo "6 - Install TrendMicro for domain1.local"
	echo "7 - Install TrendMicro for domain2.local"
	echo "8 - Create new user"
	echo "9 - Copy standardized bashrc"
	echo ""
	echo "0 - exit program"
	echo ""
	echo -n "Enter selection: "
	read selection
	echo ""
case $selection in
	1 ) sh /scripts/RH7_CentOS7/networkchg_RH7_CentOS7.sh ;;
	2 ) sh /scripts/RH7_CentOS7/hostnamechg_RH7_CentOS7.sh ;;
	3 ) sh /scripts/RHEL_subscription.sh ;;
	4 ) sh /scripts/yumupdate.sh ;;
	5 ) sh /scripts/RH7_CentOS7/Setup_RH7.sh ;;
	6 ) sh /scripts/TM_Orlando.sh ;;
	7 ) sh /scripts/TM_Peak10.sh ;;
	8 ) sh /scripts/createuser_prompt-RH.sh ;;
	9 ) sh /scripts/cpbashrc.sh ;;
	0 ) exit ;;
	* ) echo "Please enter 1 - 9 or 0"
esac
done
Here is what each of those scripts from the menu executes:
Menu 1
#!/bin/bash
clear
echo
echo "*** The current IP address is: ***"
echo "__________________________________"
ip addr
echo "__________________________________"
echo
echo "^^^ Would you like to change the network IP address? yes or no: ^^^"
read REPLY
if [ "$REPLY" == "yes" ]; then
 nmtui
echo "*** Restarting the network service ***"
echo
systemctl restart network
echo
else [ "$REPLY" == "no" ]
 echo
 echo "*** No change ***"
 echo
fi
echo "*** This is the current IP address ***"
echo "______________________________________"
ip addr
echo "______________________________________"
echo
Menu 2
#!/bin/bash
# Change hostname
clear
echo
echo "*** Confirming the static hostname is set... ***"
echo
hostnamectl status
echo
echo "^^^ The current hostname is -> `hostname` <-. Would you like to change the machine hostname? yes or no: ^^^"
read HOSTCHANGE
if [ "$HOSTCHANGE" == "yes" ]; then
 echo
 echo "**** Changing the hostname. What would you like to change it to? ****"
 read HOSTNAME
 hostnamectl set-hostname $HOSTNAME
 echo
 hostnamectl status
 sleep 3
else [ "$HOSTCHANGE" == "no" ]
 echo
 echo "*** No change ***"
 echo
fi
clear
Menu 3
#!/bin/bash
clear
subscription-manager register --username username --auto-attach
echo
subscription-manager attach --pool=longidstring
echo
echo "Currently assigned and consumed"
echo "_______________________________"
echo
subscription-manager list --consumed
echo "_______________________________"
clear
Menu 4
#!/bin/bash
clear
yum install -y wget vim rsync
yum -y update
echo
echo "^^^ Updates have been applied. Would you like to reboot? yes or no: ^^^"
read RESPONSE
if [ "$RESPONSE" == "yes" ]; then
 echo
 echo "**** Rebooting ****"
 sleep 3
 reboot
else [ "$RESPONSE" == "no" ]
 echo
fi
clear
Menu 5
This next script runs a hardening process for PCI compliance. Basically, it’s a script that launches many scripts that hardens the server based on CIS Red Hat 7 Benchmark and OpenSCAP hardening along with some standing installs and configurations.
#!/bin/bash
clear
echo "----------------------------------------------------"
echo "@@@ OS Hardening @@@"
sleep 4
echo
echo "----------------------------------------------------"
echo "*** CIS 1-1 - Sticky bit, disbable mounting ***"
echo
sh /scripts/RH7_CentOS7/PCI_scripts_RH7_CentOS7/CIS_1-1_fs.sh
echo
##read -p "Press [Enter] to continue"
echo "----------------------------------------------------"
echo "*** CIS 2-1 - Remove special services ***"
echo
sh /scripts/RH7_CentOS7/PCI_scripts_RH7_CentOS7/CIS_2-2_removespecialservices.sh
echo
#read -p "Press [Enter] to continue"
echo "----------------------------------------------------"
echo "*** CIS 2-3 - Remove services ***"
echo
sh /scripts/RH7_CentOS7/PCI_scripts_RH7_CentOS7/CIS_2-3_removeservices.sh
echo
#read -p "Press [Enter] to continue"
echo "----------------------------------------------------"
echo
echo "*** CIS 3-1 - Modify Network Parameters ***"
echo
sh /scripts/RH7_CentOS7/PCI_scripts_RH7_CentOS7/CIS_3-1_modifynetparam.sh
echo
#read -p "Press [Enter] to continue"
echo "----------------------------------------------------"
echo "*** CIS 3-3 - Disable IPv6 ***"
echo
sh /scripts/RH7_CentOS7/PCI_scripts_RH7_CentOS7/CIS_3-3_modifyipv6.sh
echo
#read -p "Press [Enter] to continue"
echo "----------------------------------------------------"
echo "*** CIS 3-4 - Install TCP Wrappers ***"
echo
sh /scripts/RH7_CentOS7/PCI_scripts_RH7_CentOS7/CIS_3-4_tcpwrappers.sh
echo
#read -p "Press [Enter] to continue"
echo "----------------------------------------------------"
echo "*** CIS 3-5 - Uncommon Network Protocols ***"
echo
sh /scripts/RH7_CentOS7/PCI_scripts_RH7_CentOS7/CIS_3-5_uncommonnetwork.sh
echo
#read -p "Press [Enter] to continue"
echo "----------------------------------------------------"
echo "*** CIS 3-6 - Enable IPtables & add rules ***"
echo
sh /scripts/RH7_CentOS7/PCI_scripts_RH7_CentOS7/CIS_3-6_confirmfirewall.sh
echo
#read -p "Press [Enter] to continue"
echo "----------------------------------------------------"
echo "*** CIS 4-1 - Configure Auditing ***"
echo
sh /scripts/RH7_CentOS7/PCI_scripts_RH7_CentOS7/CIS_4-1_configsysacct.sh
echo
#read -p "Press [Enter] to continue"
echo "----------------------------------------------------"
echo "*** CIS 4-2 - Configure logs ***"
echo
sh /scripts/RH7_CentOS7/PCI_scripts_RH7_CentOS7/CIS_4-2_configlogfiles.sh
echo
#read -p "Press [Enter] to continue"
echo "----------------------------------------------------"
echo "*** CIS 5-2 - Configure SSH ***"
echo
sh /scripts/RH7_CentOS7/PCI_scripts_RH7_CentOS7/CIS_5-2_configssh.sh
echo
#read -p "Press [Enter] to continue"
#echo "----------------------------------------------------"
#echo "CIS 5-3 - Set lockout for failed password"
#echo
#sh /scripts/RH7_CentOS7/PCI_scripts_RH7_CentOS7/CIS_5-3_logout.sh
#echo
##read -p "Press [Enter] to continue"
echo "----------------------------------------------------"
echo "*** CIS 5-4 - Set password expiration, lock inactive user accounts ***"
echo
sh /scripts/RH7_CentOS7/PCI_scripts_RH7_CentOS7/CIS_5-4_passwordexp.sh
echo
#read -p "Press [Enter] to continue"
echo "----------------------------------------------------"
echo "*** CIS 6-2 - Configure home directory, additional auditing ***"
echo
sh /scripts/RH7_CentOS7/PCI_scripts_RH7_CentOS7/CIS_6-2_checkuserhome.sh
echo
echo "----------------------------------------------------"
echo "@@@ Additional hardening cont'd @@@"
echo
sh /scripts/RH7_CentOS7/PCI_scripts_RH7_CentOS7/RHEL7_PCI_harden.sh
echo
#echo "---->> Complete <<----"
echo -e "---->> \033[33;7mHardending Completed\033[0m <<----"
echo
sleep 4
clear
echo "----------------------------------------------------"
echo "@@@ Setting up SNMPv3 @@@"
sh /scripts/RH7_CentOS7/snmp_abc_RH7_CentOS7.sh
sleep 4
clear
echo "----------------------------------------------------"
echo "@@@ Installing Splunk @@@"
sh /scripts/splunk_inst.sh
sleep 4
clear
echo "----------------------------------------------------"
echo "@@@ Installing VMware Tools @@@"
sh /scripts/vmwaretools.sh
sleep 4
clear
echo "----------------------------------------------------"
echo "@@@ Configure Max Password Age for root @@@"
sh /scripts/rootmaxpass.sh
sleep 4
clear
echo -e "---->> \033[33;7mCompleted Setup\033[0m <<----"
sleep 4
clear
Menu 6 & 7
Basically, those are scripts for install TrendMicro
Menu 8
#!/bin/bash
clear
echo -n "Enter a username: "
read name
useradd -m $name
passwd $name
chage -d 0 $name
echo
echo "^^^ Would you like to add the new user to the sudoers? yes or no: ^^^"
read REPLY
if [ "$REPLY" == "yes" ]; then
 echo
 echo "** Adding user to the end of the file **"
 echo
 echo "$name ALL=(ALL) ALL" >> /etc/sudoers
 echo
 echo "** Here is the output confirmation **"
 sleep 5
 cat /etc/sudoers
 sleep 3
else [ "$REPLY" == "no" ]
 echo
 echo "** Not adding user **"
 echo
fi
sleep 3
clear
Menu 9
I have a custom bashrc. If you are interested in seeing it, just post in the comments and I will update this post with the custom file.
#!/bin/bash
clear
echo
echo "** Configure custom bashrc **"
echo
echo "** Current bashrc **"
sleep 3
clear
cat $HOME/.bashrc
sleep 5
echo
echo "** Backing up current bashrc **"
sleep 3
cp $HOME/.bashrc $HOME/.bashrc.bk
echo
echo "** Copying custom bashrc **"
cp -f /scripts/bashrc $HOME/.bashrc
echo
echo "** New bashrc **"
sleep 3
clear
cat $HOME/.bashrc
sleep 5
clear
Shell Scripting: My Story, My Post-Install – Part 2
One thing I figure I should post is my app script referenced in the last post. This is what I use to install my favorite applications that is referenced in my post-install script for Fedora based distros.
#!/bin/bash
selection=
until [ "$selection" = "0" ]; do
 echo ""
 echo "PROGRAM INSTALLATION MENU"
 echo "1 - Install Geany"
 echo "2 - Install Chrome"
 echo "3 - Install Guake"
 echo "4 - Install htop"
 echo "5 - Install inxi"
 echo "6 - Install Nano"
 echo "7 - Install ncdu"
 echo "8 - Install nmap"
 echo "9 - Install Shutter"
 echo "10 - Install terminology"
 echo "11 - Install tlp"
 echo "12 - Install vim"
 echo ""
 echo "0 - exit program"
 echo ""
 echo -n "Enter selection: "
 read selection
 echo ""
 case $selection in
 1 ) sudo dnf install -y geany ;;
 2 ) sudo dnf install -y google-chrome ;;
 3 ) sudo dnf install -y guake ;;
 4 ) sudo dnf install -y htop ;;
 5 ) sudo dnf install -y inxi ;;
 6 ) sudo dnf install -y nano ;;
 7 ) sudo dnf install -y ncdu ;;
 8 ) sudo dnf install -y nmap ;;
 9 ) sudo dnf install -y shutter ;;
 10 ) sudo dnf install -y terminology ;;
 11 ) sudo dnf install -y tlp ;;
 12 ) sudo dnf install -y vim ;;
 0 ) exit ;;
 * ) echo "Please enter 1 - 12 or 0"
 esac
done
Shell Scripting: My Story, My Post-Install – Part 1
If you’ve been following my blog for a while you will get a sense that I am a Linux enthusiast. Recent historical post will show that I have achieved a few Linux certifications. In my very short career as a Linux Administrator, I have found that shell scripting is extremely useful, especially for those repetitive task. After achieving my Linux certifications I set out to try to learn bash shell scripting using some online courses, online tutorials and even buying a couple of books. I’ve been using it for a while but I am nowhere near to where I want to be as far as being an expert.
Saying all that I get to this point: I plan on posting some sample shell scripts here I have created that have helped me in my professional and personal tech life. I don’t at all claim to be an expert so what you see is what you get. Take and use it as you like, if you want.
In this post I will share some scripts and processes I have used on several occasions as my post install scripts for when I install Linux (Debian and Red Hat based) on my personal and work machines, physical and virtual. What I have found really useful for storing my scripts is git using the free service Bitbucket. Here is my process for my personal machines (I use Ubuntu Mate on my desktop and Korora on my laptop):
- Install the operating system
- Complete a git clone (git clone https://username@bitbucket.org/username/scriptrepo.git) from command line, assuming git is already installed (Fedora based distros do have it installed by default), to pull down all my shell scripts and then launch my custom shell script.
Below is the script that I use for my Fedora based install:
#!/bin/bash
# script to complete a post-install auto setup

# Complete system and OS updates
echo
echo "^^^ Would you like to complete OS updates? yes or no: ^^^"
read UPDATESRESPONSE
if [ "$UPDATESRESPONSE" == "yes" ]; then
	echo
	echo "**** Completing OS updates ****"
	echo
	sleep 3
	sudo dnf update -y
else [ "$UPDATESRESPONSE" == "no" ]
	echo
        echo "---- Proceeding with setup ----"
fi
sleep 3
echo
# Creates a 'bin' directory in your home directory
echo "Creating 'bin' directory in home"
mkdir $HOME/bin
echo
echo "@@@@ Changing to configs directory @@@@"
cd $HOME/scripts_repo/configs
echo
sleep 3
# Launches a custom script to install preferred applications
echo "==== Will now install apps ===="
echo
sh $HOME/scripts_repo/configs/fedora_apps_home.sh
echo
sleep 3
# Copies a custom '.bashrc' file
echo "==== Will now configure bash. Making a backup of .bashrc ===="
cp $HOME/.bashrc $HOME/.bashrc.bk
echo
echo "---- Replacing .bashrc with configured version ----"
cp -f $HOME/scripts_repo/configs/bashrc_Fed $HOME/.bashrc
echo
echo "--- Done ---"
echo
sleep 3
# Copies a custom '.vimrc' for VIM
echo "==== Now proceeding with configuring VIM. Making a backup ===="
cp $HOME/.vimrc $HOME/.vimrc.bk
echo
echo "---- Replacing .vimrc with configured version ----"
echo
cp -f $HOME/scripts_repo/configs/vimrc $HOME/.vimrc
echo "---- Done with vimrc ----"
echo
sleep 3
# Adding Terminology to autostart. Works best with Gnome & Mate desktop environment
echo "==== Copying Terminology startup config ===="
cp -f $HOME/scripts_repo/configs/terminology.desktop $HOME/.config/autostart/terminology.desktop
echo
echo "---- Done with startup config ----"
echo
sleep 3
# Copies custom 'hosts' file for LAN resolution
echo "==== Copying home LAN hosts file ===="
echo
echo "^^^ Copy your home LAN hosts file? yes or no: ^^^"
read HOSTSRESPONSE
if [ "$HOSTSRESPONSE" == "yes" ]; then
	echo
	sudo cp -f /etc/hosts /etc/hosts.bk && cat $HOME/scripts_repo/configs/home_hosts | sudo tee -a /etc/hosts
else [ "$HOSTSRESPONSE" == "no" ]
	echo
	echo "Not changing hosts file"
	echo
fi
echo
echo "---- Done with hosts file ----"
echo
sleep 3
# Change the system's hostname
echo "^^^ The current hostname is -> `hostname` <-. Would you like to change the machine hostname? yes or no: ^^^"
read HOSTCHANGE
if [ "$HOSTCHANGE" == "yes" ]; then
	echo
	echo "**** Changing the hostname. What would you like to change it to? ****"
	read HOSTNAME
	sudo hostnamectl set-hostname $HOSTNAME
	echo
	hostnamectl status
	sleep 7
	echo
        echo "**** Will now update /etc/hosts ****"
else [ "$HOSTCHANGE" == "no" ]
        echo
        echo "---- Proceeding with setup ----"
fi
echo
HOSTCALL=`hostname`
sudo sed -i "s/localhost.localdomain/$HOSTCALL/g" /etc/hosts
echo
echo "**** Here is the updated /etc/hosts file ****"
echo
sudo cat /etc/hosts | awk '/^127.0.0.1/{print $1,$2,$3}'
echo
sleep 3
# A choice to reboot or not
echo "^^^ Would you like to reboot? yes or no: ^^^"
read REBOOTRESPONSE
if [ "$REBOOTRESPONSE" == "yes" ]; then
        echo
        echo "**** Rebooting ****"
        sleep 3
        sudo shutdown -r now
else [ "$REBOOTRESPONSE" == "no" ]
	echo
        read -p "**** Done with configuration of system. Hit [Enter] to continue ****"
fi
exit
Basically, what the script does is run OS updates, creates a ‘bin’ directory to store my scripts that I run all the time, then installs my favorite apps, copies over my custom ‘.bashrc’ file, then my custom ‘.vimrc’ file, some startup files, copies a custom /etc/hosts file that has all the host on my LAN, then updates my machines hostname then updates the /etc/hosts file with my machines new hostname, then ask me if I want to reboot or not.
I also have an Ubuntu script that does basically the same thing.
Next post, I will post a script template I use for post-installs of CentOS/Red Hat servers that I use at work.
